نشانی: خ آزادی، خ بهبودی، نرسیده به نصرت، ساختمان بنیامین، پ 145، طبقه 5، واحد 18- مجهز به (2) آسانسور و پارکینگ- تماس: 66097851 (7 خط), 66030825-021

دفتر مرکزی: 66097851     مرکز تعمیرات: 66097859   شعبه شرق :77978135   شعبه هفت تیر: 88836102   شعبه جنوب: 55300568 شعبه غرب 44153186 شعبه شمال 26721443  
شعبه اسلامشهر و رباط کریم 56746602

مرحله ۱: مشخصات بارز این مدل سامسونگ شامل:

  • پردازنده چهار هسته ای ۱.۴ گیگاهرتز
  • اندروید ۴.۰
  • نمایشگر چند تاچ با دیجیتالی کننده دوتایی، ۱۴۹ ppi، ۱۲۸۰ * ۸۰۰ پیکسل
  • رم ۲ گیگا بایت
  • ذخیره خارجی بالای ۶۴ گیگا بایت و داخلی ۳۲/۱۶ گیگا بایت
  • دوربین عقب ۵ مگاپیکسل و دوربین جلو ۱.۹ مگاپیکسل

We've got our hands on a brand new Samsung Galaxy Note 10.1. Before we tear it open to reveal its secrets, let's note some of its notable specs:Android 4.0

مرحله ۲

  • لبه پایین گلکسی نوت ۱۰.۱ فط کانکتور ۳۰ پینی و میکروفن دارد.
  • لبه بالایی نوت ۱۰.۱ نیز دارای دوشاخه های زیادی از جمله دکمه های برق و صدا، شیار میکرو SD، فرستنده گیرنده IR و جک صدا می باشد.

The bottom edge of the Galaxy Note 10.1 features only the proprietary 30-pin dock connector and microphone.The top edge of the Note 10.1 features a plethora of plugs and doodads, including the power and volume buttons, MicroSD slot, IR transceiver, and audio jack.

مرحله ۳

  • در نگاه اول، استیلوس تنها دکمه­ی خارج از قاب پلاستیکی است.
  • قلم S داخل تبلت قرار می گیرد.
  • با توجه به طراحی این مدل، قلم S و دیجیتالی کننده برای بهینه کردن سیم کشی طراحی شده اند.
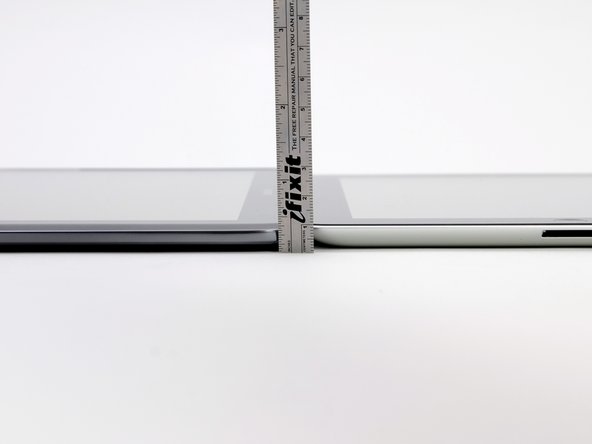
At first glance, it appears as though the stylus is just another button on the exterior of the plastic bezel.But no! Just like stashing a pencil in the spiral binding of a notepad, the S Pen is sneakily stored inside the tablet.

مرحله ۴

  • نوت ۱۰.۱ با ضخامت ۸.۹ میلیمتر، در واقع نازک تر از iPad نسل سوم است و تقریبا ضخامتی مانند iPad 2 دارد.
  • قلم استاندارد آن ۶.۴ میلیمتر است.
  • نمایشگر ۱۰.۱ اینیچی روی نوت ۱۰.۱ بزرگتر از صفحه ۹.۷ اینچی iPad می باشد.
  • نوت ۱۰.۱ و iPad فقط چند اینچ کوتاهتر از طول مورب ۱۳.۹ اینچی یک قطعه کاغذ استاندارد هستند.

The Note 10.1, with a thickness of 8.9 mm, is actually thinner than the third generation iPad, and almost the same thickness as the iPad 2.As a reminder, a standard pencil measures in at 6.4 mm. So, if you're looking for the ultimate slimness in note taking, paper and pencil is still the way to go.The 10.1" screen on the Note 10.1 is also larger than the 9.7" screen on the iPad.

مرحله ۵

  • ترکیبی از پیچ ها و گیره ها در نوت ۱۰.۱ وجود دارد.
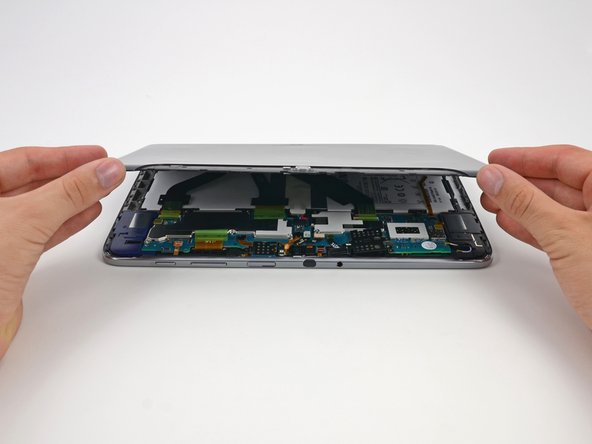
A few Phillips screws, a few clips, and we're in!We like the combination of screws and clips. The screws are enough of a hassle to keep out meddling kids, but will by no means deter anyone who needs to fix something inside.We like the combination of screws and clips. The screws are enough of a hassle to keep out meddling kids, but will by no means deter anyone who needs to fix something inside.

مرحله ۶

  • داخل سامسونگ نوت ۱۰.۱ نیز کانکتورهای زیادی وجود دارد. زمانی که قطعات به آسانی در دسترس بوده و برداشته می شود، تعمیر آنها نیز راحت تر خواهد بود.
  • اولین قطعه خارج از نوت ۱۰.۱ کارت میکرو SD و موتور ارتعاشی است.
  • در حالیکه ذخیره سازی خارجی نیز وجود دارد، اما نوت ۱۰.۱ می تواند از کارت های میکرو SD تا ۶۴ گیگا بایت پشتیبانی کند.

We take our first look inside the Note 10.1, and we're greeted with a cornucopia of connectors.  By our count, there are 16!Having a lot of connectors is a huge boon for repairability. When components can be easily accessed and removed, repairs are much easier.The first component out of the Note 10.1 is the MicroSD card and vibration motor.

مرحله ۷

  • دوربین جلو، فلش LED و دوربین عقب در سمت راست و یکی پس از دیگری قرار دارد.

The front-facing camera, the LED flash, and the rear-facing camera come out one right after the other.The front-facing camera, the LED flash, and the rear-facing camera come out one right after the other.The front-facing camera, the LED flash, and the rear-facing camera come out one right after the other.

مرحله ۸

  • دوربین عقب ۵ مگاپیکسلی و دوربین جلوی ۲ مگاپیکسلی از قطعات مستقل هستند.

Neither the 5 MP rear camera nor the 2 MP front camera are notable in and of themselves, but the fact that they are independent components—as opposed to sharing a single cable—is pretty cool.Neither the 5 MP rear camera nor the 2 MP front camera are notable in and of themselves, but the fact that they are independent components—as opposed to sharing a single cable—is pretty cool.Neither the 5 MP rear camera nor the 2 MP front camera are notable in and of themselves, but the fact that they are independent components—as opposed to sharing a single cable—is pretty cool.

مرحله ۹

  • باتری به آسانی برداشته می شود حتی زمانی که با Nexus 7 مقایسه می شود.

While it may appear as though the battery in the Note 10.1 is strapped down à la Gulliver, the ribbon cables are very easy to detach.In fact, the battery is very easy to remove, even when compared to the Nexus 7.In fact, the battery is very easy to remove, even when compared to the Nexus 7.

مرحله ۱۰

  • همانند iPad جدید، باتری سامسونگ نوت ۱۰.۱ قسمت زیادی از وزن دستگاه را شامل می شود. وزن آن ۱۳۶ گرم است. که ۲۳ درصد از وزن ۵۹۷ گرمی دستگاه می باشد.
  • ولتاژ باتری ۳.۷ ولت، ۷۰۰۰ mAh و ۲۵.۹۰ وات ساعت است.
  • باتری به ۲۵.۹۰ وات ساعت برای عمر تخمینی باتری ۸ ساعت تنزل پیدا می کند.
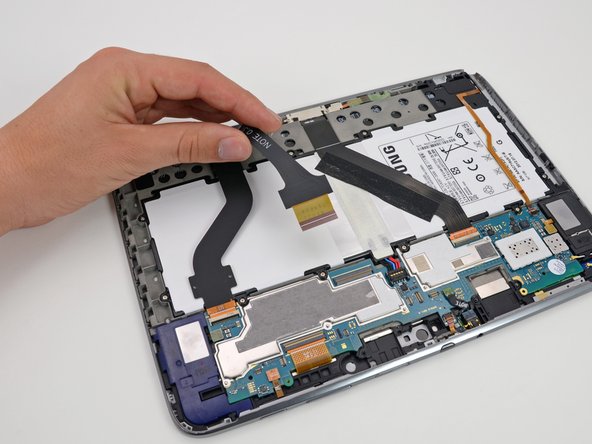
Just like in the new iPad, the battery in the Note accounts for a large portion of the device's weight. It weighs in at 136 grams. That's 23 percent of the 594 gram device.

مرحله ۱۱

  • کابل های نواری متصل به مادربرد باید از نوت جدا شوند.

We happily detach the last of the ribbon cables connected to the motherboard and pull it free from the Note. Well, that was easy!We happily detach the last of the ribbon cables connected to the motherboard and pull it free from the Note. Well, that was easy!

مرحله ۱۲

  • گاهی اوقات روکش های EMI می توانند به راحتی برداشته شده که به روش استفاده سازنده برای اتصال آنها به مادربرد بستگی دارد. در برخی موارد، این روکش ها مستقیما به مادربرد متصل شده (بدترین حالت)، در حالیکه در سایر موارد فریم های روکش ها لحیم کاری شده اما کاورهای بالا قابل تعویض هستند.
  • روکش های EMI با پیچ متصل شده اند. زمانی که آنها به قطعات متصل هستند در اینصورت باید از لحیم خارج شوند.

Sometimes EMI shields can be scary/tricky to remove, depending on which procedure a manufacturer uses to attach them to the motherboard. In some cases, the shields are soldered directly to the motherboard (the worst scenario), while in others the frames of the shields are soldered, but the top covers are removable.…Unless EMI shields happen to be screwed in, as is the case here. We love screws, especially when they hold in components that typically require desoldering.

مرحله ۱۳

  • علاوه بر پشتیبانی از قطعات مهم مادربرد از تداخل الکترومغناطیسی، مشهود است که این روکش های MEI با عنوان سینک های حرارتی نوت کار می کنند.
  • فیلم سبز روی داخل روکش های EMI با خمیر گرمایی و پدهای گرمایی محکم شده است که به برداشتن گرما از مادربرد از طریق سوراخ های کوچک بالای روکش های کمک می کند.

In addition to protecting important components of the motherboard from electromagnetic interference, it appears that these EMI shields also serve as the Note's heat sinks.

مرحله ۱۴

  • قطعات اصلی روی مادربرد:
  • پردازنده ۱.۴ گیگاهرتز Exynos 4 Quad سامسونگ با گرافیک ۳ بعدی یکپارچه
  • Wacom W8008 (احتمالا برای ورودی قلم S استفاده شده)
  • کنترل کننده صفحه لمسی Atmel mXT1664S
  • فلش مموری KLMAG2GE4A NAND سامسونگ
  • کدکس صوتی Wolfson Audio WM1811AE
  • F0514A 430 1201KP411

There are some major players on this motherboard:

مرحله ۱۵

  • همانند قطعاتی که در مراحل بالا قطع شدند، کانکتور پایه نیز می تواند با قطع کانکتور و باز شدن پیچ ها برداشته شود.
  • کابل کانکتور پایه سامسونگ دارای اندکی مس با میکروفن اندک است.
  • کانکتور پایه سامسونگ همانند کانکتور پایه اپل نیست.

Just like all of the components that we disconnected in the first few steps, the dock connector can be removed by simply detaching a connector and unscrewing a pair of screws. More points for repairability!As a reminder, the Samsung dock connector is not the same as Apple's dock connector, as shown by this image.

مرحله ۱۶

  • در اینجا بنظر می رسد که هیچ پیچ زیادی در سمت چپ وجود ندارد تا از دستگاه خارج شود.
  • اسپیکرها با چسب اندک محکم شده اند.
  • اسپیکرها در نوت ۱۰.۱ احتمالا هر گلس را پخش نمی کنند اما در اصل برای صداهای لذت بخش هدایت شده از رابط نوت مطلوب می باشند.

At this point, it appears that there are no more screws left to remove from the device.If you've been keeping score, you'll note that there are only five different size screws. This is a nice change from some devices that use nearly as many just to hold the lower case in place.vThe speakers were held in place with some light adhesive, which we spudged right up!

مرحله ۱۷

  • اکنون LCD باید از گلس و دیجیتالی کننه جدا شود.
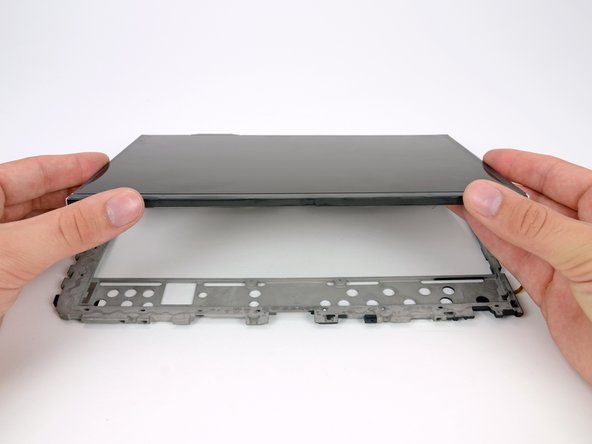
It's time for the moment of truth—when we find out if the LCD can be separated from the glass and digitizer.This tends to be a large factor in determining a device's repairability score. If the glass can be replaced separate from the LCD, replacing a shattered screen becomes a much cheaper fix.Success! Repair enthusiasts everywhere—rejoice! The front glass and LCD can be separated and replaced individually. iPhone design engineers should take notes.

مرحله ۱۸

  • با خارج شدن LCD، بعضی مشخصات آن شامل:
  • طول مورب ۱۰.۱ اینچ
  • ۱۲۸۰ * ۸۰۰ پیکسل
  • ۱۴۹ ppi
  • دیجیتالی کننده دوتایی و تاچ چندتایی

The LCD is out, so let's check out some specs:

مرحله ۱۹

  • چسب نگهدارنده جک هدفون به فریم قوی نیست اما نمی تواند زاویه خوبی را ایجاد کند.
  • جک هدفون با ابزار باز کردن پلاستیکی برداشته می شود.

Though many of the small components in this device are easily accessible without removing all the innards, the headphone jack has held strong this entire time.The adhesive holding the headphone jack to the frame is not exceptionally strong, but we have not been able to get a good angle on it until now.

مرحله ۲۰

  • برداشتن فریم و LCD از قاب جلو باعث مشکل می شود. فریم با بست های پلاستیکی کوچک وصل است که از طریق سوراخ های فریم قرار می گیرد و بنظر می رسد که هیچ راهی برای برداشتن فریم بدون خارج کردن حلقه های کوچک وجود ندارد.
  • چندین گیره و چسب در فریم وجود دارد، بنابراین تمامی آنها در زمان مونتاژ مجدد دستگاه باید بخوبی متصل شوند.
  • گلس جلو باید با اسپادگر از قاب نمایشگر جدا شود که در اینصورت تایید می شود گلس جلو و دیجیتالی کننده می توانند تعویض شوند.

Removing the frame and LCD from the front bezel presented a problem. The frame was held down by small plastic fasteners that protruded through holes in the frame, and were topped with small plastic rings. It seems that there is no way to remove the frame without snapping off the small rings.As user Mark H. points out in the comments, this is a manufacturing procedure called heat staking.Luckily, there are other clips and adhesive on the frame, so it should all hold together fine when we reassemble the device.

مرحله ۲۱

  • امتیاز قابلیت اطمینان سامسونگ گلکسی نوت ۱۰.۱: ۸ از ۱۰ (۱۰ آسانترین تعمیر است).
  • پس از برداشتن کیس عقب، اکثر قطعات می توانند بدون برداشتن سایر قطعات برداشته شوند.
  • گلس جلو و LCD می توانند بطور مجزا تعویض شده، که این کار باعث کاهش هزینه تعمیر شود.
  • تمام پیچ ها از نوع فیلیپس #۰ هستند و فقط ۵ سیم دارای طول متفاوتی می باشند.
  • قطعات مدولار هستند. نبود کابل های نواری پیچیده کار تعویض قطعات را آسانتر می کند.
  • کیس عقب با گیره ها و پیچ های زیادی متصل است. هیچ چسبی وجود نداشته اما گیره می توانند به درستی باز شوند.
  • برای برداشتن باتری ،ابتدا باید ۴ کابل و بعضی از نوارها را قطع کرد.

فریم داخلی و بعضی از قطعات دیگر با چسب زیادی محکم شده اند.

Samsung Galaxy Note 10.1 Repairability Score: 8 out of 10 (10 is easiest to repair).Once the rear case is off, most components can be individually replaced without removing any other parts.

از این مطلب نیز دیدن کنید: صفحات پس زمینه سامسونگ گلکسی S10, S10e

دیدگاه‌ خود را بنویسید

نشانی ایمیل شما منتشر نخواهد شد. بخش‌های موردنیاز علامت‌گذاری شده‌اند *

8 − 2 =